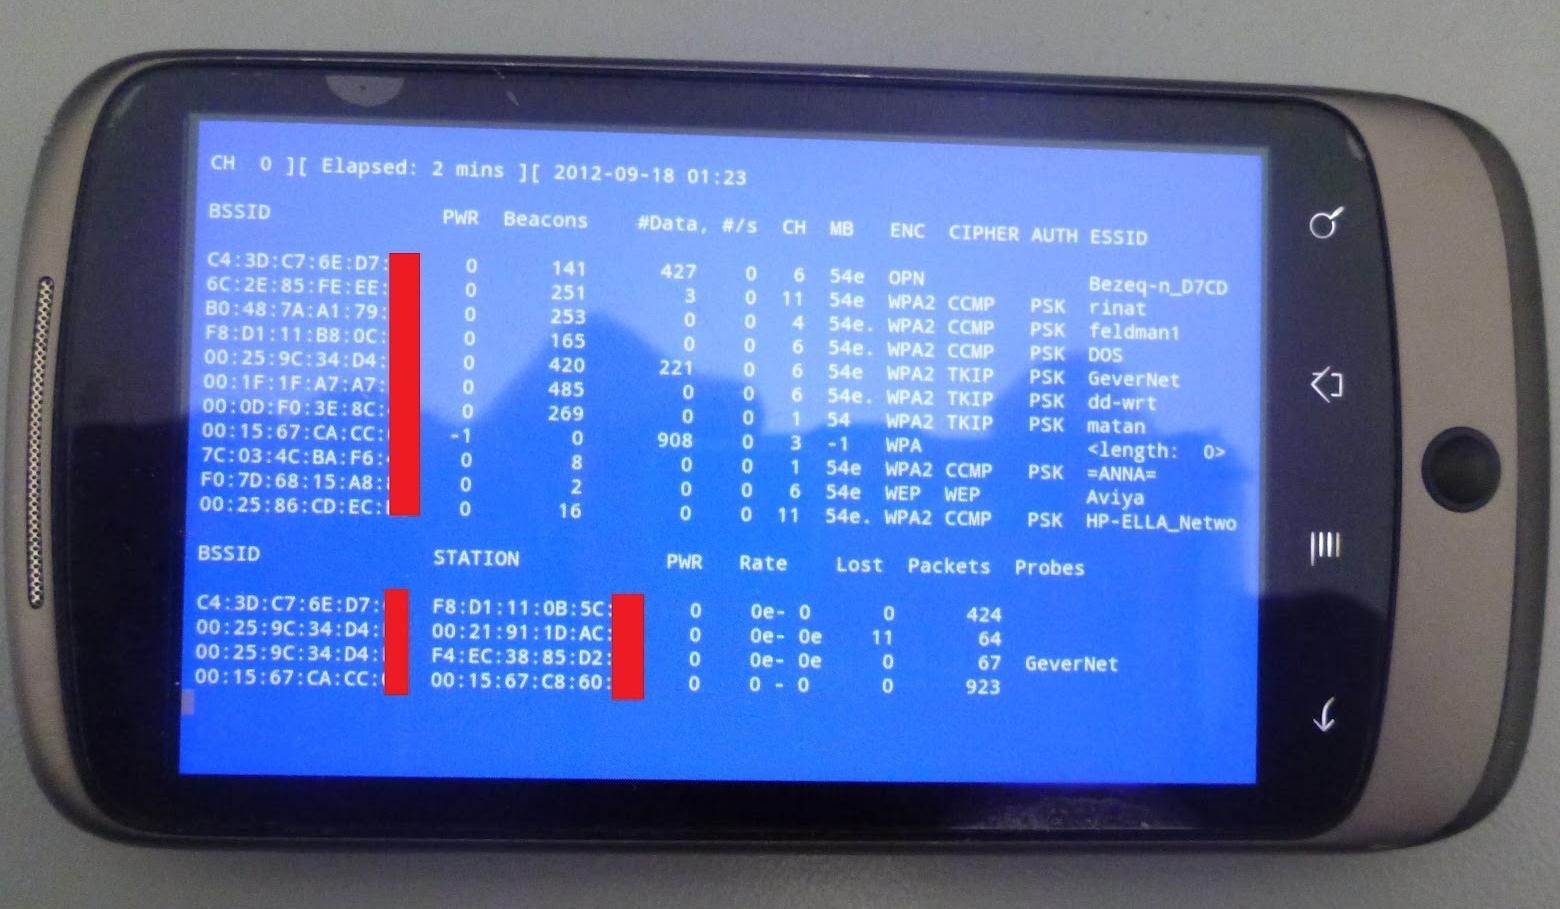
neighbor's super fast Wi-Fi connection? If they're smart, they probably have it password protected (otherwise you wouldn't be reading this, would you?). But if you have an Android phone, you can get back at them for always parking in your spot and slamming the door when they get home at 2 a.m.—by stealing...er, borrowing, their connection.
Monitor mode lets you see all the traffic going through a network and how many devices are connected to it, but it can also be used for more nefarious purposes. If you're patient enough, you can crack the WEP key on a network by capturing data packets in monitor mode.
To add monitor mode to an Android device, the researchers reverse engineered the Broadcom radio chip. They modified the firmware on the chipsets in the Nexus One and Galaxy S II, which are the same ones used in the majority of mobile devices. The code is posted on Google Code, but you'll need to know which chipset you have and download the right one for your phone.
Once you've downloaded the code, it's as simple as extracting the .zip file, then running the setup and configuration files. They've included instructions for each chipset and a few different devices on their blog, so head over there to find the specifics for yours.
After it's up and running, check out one of our tutorials to learn how to use it to crack the key. So, next time your neighbor wants to borrow your power drill, rest assured that you're "borrowing" something much more valuable from them!
Showing up-to-date information, stats, photos, news summaries, as well as giving users quick access to specific features, these widgets reside within the Notification Center—more specifically, the Today view.
All you need to do is install widget-compatible applications onto your device and follow the instructions below to get widgets in your iOS 8 Notification Center.
Adding a Widget to Your Notification Center
To add a widget, slide down the Notification Center and scroll to the bottom of the Today view until you see Edit. There, you'll find the stock Apple widgets, as well as any new applications on your device that have incorporated widget compatibility.
Add a widget to your Notification Center by tapping on the green plus sign next to the application under Do Not Include. Once they're included at the top of the page, you can rearrange them by holding down on the three-dash icon on the right side and sliding into place.
Similarly, to remove a widget, just tap the red minus sign. When you're all set, hit Done on the top-right corner.
Using Your Widgets
You should now see different sized, interactive widgets all over your Notification Center. Below you can see widgets for Yahoo Weather,Evernote, NYT Now, and VICE News.
Yahoo Weather shows off weather information along with a photo of the city you're near, while Evernote allows users to create several types of notes from their widget.
One of my favorite widget-compatible apps is Wdgts, which allows you to place several types of widgets in the Notification Center, such as a photo frame slideshow, a calendar, a simple calculator, and more.
Another pretty nifty widget is the one for iTranslate, which quickly translates the last thing you've copied to your clipboard. Dropbox gives users access to some the latest files they've uploaded to their cloud service.
As developers start to integrate their apps with iOS 8, look for more applications to update their code to include widget support on your iOS device. ESPN's SportsCenter, eBay, and other popular applications should make their way to your Notification Center soon.
A score of my readers have been begging for tutorials on how to hack Wi-Fi, so with this article, I'm initiating a new series dedicated to Wi-Fi hacks. This will probably be around 6-9 articles, starting with the basics of the technologies.
I can hear you all groan, but you need to know the basics before you get into more advanced hacking. Then hopefully, developing your own hacks.
Afterward, the following guides will cover wardriving, DOS attacks, password hacking (WEP, WPA, WPA2, WPS, and WPA-enterprise), rogue APs, evil twins, Wi-Fi MitM, and Wi-Fi snooping. Lastly, we'll examine how to hack Bluetooth (yes, I know, technically it's not Wi-Fi, but I think you'll find it interesting).
So, come along for this frequent and amplified ride of Wi-Fi hacking!
Step 1: Terminology
To really understand how to hack Wi-Fi, we need to dispense with basic terms and technology. First, let's address some terminology.
To begin, the access point that sends out the radio frequency (RF) signal is known as the AP. These APs are capable of sending out signals (between 2.4 and 5 Ghz) that comply with a number of different standards. These standards are known as 802.11a, 802.11b, 802.11g, and 802.11n. In the very near future, we'll see a new standard that's tentatively named 802.11ac.
The table below summarizes the key features of these Wi-Fi standards.
These standards are generally backwardly compatible, so that a wireless n adapter will also be able to pick up g and b signals. We will focus upon the most widely used of these standards— b, g, and n.
Step 2: Security Technology
From the perspective of the hacker, wireless security technologies are among the most pertinent features. Multiple security technologies have been deployed in Wi-Fi to make an inherently insecure technology secure. Our attack approach will depend upon which of these security technologies is being deployed.
So, let's take a quick look at them here.
WEP
WEP, or wired equivalent privacy, was the first wireless security scheme employed. As it name implies, it was designed to provide security to the end-user that was essentially equivalent to the privacy that was enjoyed in a wired environment. Unfortunately, it failed miserably.
For a number of reasons, WEP is extraordinarily easy to crack because of a flawed implementation of the RC4 encryption algorithm. It's not unusual to be able to crack WEP in less than 5 minutes. This is because WEP used a very small (24-bit) initialization vector (IV) that could be captured in the datastream, and this IV could then be used to discover the password using statistical techniques.
Despite this, I still find it being used in household and small business implementations, but seldom in an enterprise environment.
WPA
WPA was the response by the industry to the revealed weaknesses of WEP. It's often referred to as WPA1 to distinguish it from WPA2.
WPA used Temporal Key Integrity Protocol (TKIP) to improve the security of WEP without requiring new hardware. It still uses WEP for encryption, but it makes the statistical attacks used to crack WEP much more difficult and time-consuming.
WPA2-PSK
WPA2-PSK is the implementation of WPA2 for the home or small business user. As the name implies, it's the WPA2 implementation that uses a pre-shared key (PSK). It's this security standard that is used by most households today, and although it's far more secure, it's still vulnerable to various attacks.
A feature that was added in 2007 called Wi-Fi Protected Setup, or WPS, allows us to bypass the security in WP2-PSK . We'll look at a few attacks on WPA2-PSK in coming weeks.
WPA2-AES
WPA2-AES is the enterprise implementation of WPA2. It uses the Advanced Encryption Standard or AES to encrypt data and is the most secure. It's often coupled with a RADIUS server that is dedicated for authentication.
Although cracking it is possible, it significantly more difficult.
Step 3: Channels
Like our radio, wireless has multiple channels so that various communication streams don't interfere with each other. The 802.11 standard allows for channels ranging from 1 thru 14.
In the U.S., the FCC regulates wireless communication and devices for use in the states are only enabled to use channels 1 thru 11. Europe uses channels 1 thru 13 and Japan 1 thru 14. Other nations may also use the full range.
For the hacker, this can be useful information as a rogue AP using channel 12 thru 14 would be invisible to U.S.-made wireless devices and security professionals scanning for rogue access points.
Each channel has a width of 22 Mhz around its central frequency. To avoid interference, an AP can use any of these channels, but to avoid any overlap, channels 1, 6, and 11 are most often utilized in the U.S. The other channels can be used, but because you need five channels between the working channels to not overlap signals, with three or more channels, only 1, 6, and 11 will work.
Step 4: Datagrams and Frames
An understanding of the structure of wireless datagrams is critical for successful wireless hacking, but is beyond the scope of this introduction. I will introduce some of this information when necessary in future tutorials, but you may want to take some time to study wireless frames and datagrams from other sources.
Step 5: Signal Strength
In the U.S., the FCC regulates among other things, the strength of the wireless access point's signal. The FCC says that the access point's signal cannot exceed 27 dBm (500 milliwatts). Most access points have this limit built-in, but we can change and override this limitation, if the access point is capable of a stronger signal. This may be useful for the hacker in setting up evil twins and rogue access points where strength of signal is critical, among other techniques.
Step 6: Aircrack-Ng
For nearly all of our Wi-Fi hacking, we will be using aircrack-ng which is included in BackTrack. Even in those hacks where we use other tools such cowpatty or reaver, we will use the aircrack-ng suite of tools for some part of the hack, so we need to become familiar with it.
I'll probably do a dedicated tutorial on aircrack-ng suite in the very near future.
Step 7: WiFi Adapters
One of the crucial needs to becoming an effective Wi-Fi hacker is the Wi-Fi adapter. Generally, the Wi-Fi adapter on your laptop or desktop is insufficient for our purposes. The key capability we need is the ability toinject packets into the access point and most run-of-the-mill wireless adapters are incapable of packet injection. Aircrack-ng has a list of Wi-Fi adapters that can work with their suite of tools.
That having been said, I highly recommend Alfa AWUS036NH USB wireless adapter. This is what I use. It's available from several locations for between $30 to $50.
It does everything I need, is fast, has an external antenna, is recognized by BackTrack, and automatically loads its drivers. In addition, it come in 1000mw and 2000mw versions. That can be critical in rogue access point hacks, despite the fact that the FCC limits signal strength the 500mw.
Step 8: Attennas
Antennas come in two basic types, omni-directional and directional. Most APs and wireless adapters come with omni-directional antennas, meaning that they send and receive in all directions.
The Alfa card that I recommend comes with an external antenna that is omni-directional, but has a gain of 5dBi (gain is a measure when applied to antennas, of how much the antenna can increase the signal). This means that it can increase the signal by focusing the signal similar to that of a reflector on a flashlight. In addition, it can change position to better receive particular signals as well as a cable and suction cup adapter for mounting on a wall or window.
Directional antennas can also be useful for hacking when attempting to focus your exploits to a remote access point. The literature contains references to Wi-Fi signals that have been sent and received over 100 miles or about 160km using directional antennas. For most commercial directional antennas, you can expect to be able to pick up wireless communication up to 4km or 2.4 miles.
These can be obtained from a variety of sources usually for under $100 with a gain of between 15dBi and 20dBi. A Yagi antenna is an example of a directional antenna that is often used in hacking wireless over significant distances.
So, this begins our exciting journey into Wi-Fi hacking. Very soon, you will be able to hack nearly anyone's wireless internet, so keep coming back to expand your knowledge and skills in Wi-Fi hacking.
Many of you here are new to hacking. If so, I strongly recommend that each of you set up a "laboratory" to practice your hacks. Just like any discipline, you need to practice, practice, and practice some more before you take it out to the real world.
In many disciplines, if you don't practice, you fall victim to failure. In our discipline, if you don't practice and fail, you may be serving years behind bars. This makes practice and a dedicated practice lab an even more compelling argument than with other disciplines.
Many of you have been having difficulty setting up your hacking environment to practice your hacks. In this tutorial, I will show you thesimplest and fastest way to set up a lab to practice your hacks before taking them out into the real world where any slip-ups could be devastating!
Step 1: Download VMware Workstation or Player
The best way to practice hacking is within a virtual environment. Essentially, you set up a hacking system, such as Kali Linux, and some victims to exploit. Ideally, you would want multiple operating systems (Windows XP, Vista, 7, and 8, as well as a Linux flavor) and applications so that you can try out a variety of hacks.
Virtual machines and a virtual network are the best and safest way to set up a hacking lab. There are several virtualization systems out there, includingCitrix, Oracle's VirtualBox, KVM, Microsoft's Virtual PC and Hyper-V, and VMware's Workstation, VMware Player and ESXi. For a laboratory environment, I strongly recommend VMware's Workstation or Player. Workstation is commercial product that costs under $200, while Player is free. You can also get a free 30-day trial of Workstation.
Player is limited to just playing VMs , while Workstation can both create and play VMs. Let's download VMware's Workstation or Player here.
Step 2: Download Kali VMware Images
Once you have downloaded and installed your virtualization system, our next step is to download the VMware images of Kali provided by Offensive Security. With these images, you won't have to create the virtual machine, but simply run it from Workstation or Player—Offensive Security has already created this image for you. This means that once you have downloaded the VM of Kali, you can then use it in either Workstation or Player.
Step 3: Unzip Images
Once you have completed the download, you will need to unzip the files. There are numerous zip utilities available for free including 7-Zip, WinZip,WinArchiver, etc. Download and install one and unzip the files. In the screenshot below, I have downloaded the free trial of WinZip and have used it to unzip the Kali files.
Step 4: Open VMware Image
Once all the files have been unzipped, our next step is to open this new virtual machine. Make note of the location where you have unzipped the virtual machine image. Then, go to either VMware Workstation or Player and go to File -> Open like in the screenshot below.
This will open a window like that in the screenshot below. You can see that my Kali image was stored under documents, so I browse there and double-click on the folder.
When I do so, it reveals the VMware virtual machine file that I will load into VMware. Note that I am using the "amd64" version, which is simply the 64-bit version, but the 32-bit version will work, as well, albeit a bit slower.
When you do so, VMware will start your virtual machine and greet you with a screen like below.
Click on the green button in the upper left below "Kali-Linux-1.0.9-vm-amd64" that says "Power on this virtual machine." You should be greeted by the now familiar Kali screen like below.
Simply use the user "root" and password "toor" to get started hacking!
Step 5: Download & Install Targets
For the next step, you need to download and install a target system. Of course, you could use your own host Windows 7 or 8 system, but since this is practice, you might want to use an older, easier to hack system. In addition, hacking your own system can leave it unstable and damaged.
I recommend installing a Windows XP, Vista, Server 2003, or an older version of Linux. These systems have many known security flaws that you can practice on and, then when you become more proficient at hacking, you can then upgrade to Windows 7 and 8 and newer versions of Linux.
If you or your friends don't have a copy of these older operating systems, you can purchase them very inexpensively many places on the Internet. For instance, at last check there are numerous copies available on eBay for as low as $9.95.
Of course, you can also obtain these operating systems for free on many of the torrent sites, but BEWARE... you will likely be downloading more than just the operating systems. VERY often, these free downloads includerootkits that will embed in your system when you open the file.
In addition, older versions of Linux are available from the distributor or via torrent sites, as well.
Step 6: Download Old Applications
Once you have your operating system in place, very often you will need applications to run on these older versions of the Windows and Linux operating systems. You will likely need a browser, Office, Adobe products, etc. These older products have well-known security flaws that you can hone your skills on.
I like the site Old Apps to download many of these. Of course, once again, you can obtain these from many of the torrent sites with the same caveat as above of you might get more than you bargained for.
I'm hoping that this brief tutorial is helpful to some of you who have had difficulty setting up Kali and a lab, and now we can get back to our work of hacking, my amateur hackers!
Fi problems after updating to iOS 6 on both iPads and iPhones. The connection might work sometimes, but it usually cuts out or takes forever to connect to anything, only to time out shortly after.
It turns out this isn't so much a bug in iOS 6 itself, but rather in the update process from iOS 5. The network configuration gets corrupted during the update, causing connectivity issues.
Fortunately, there is an easy fix that won't require you to reset your entire phone (though it will require you to re-enter each of your Wi-Fi passwords).
Step 1: Reset Your Network Settings
Tap Settings -> General -> Reset -> Reset Network Settings and confirm.
This will clear the corrupt settings that are causing you problems, but it will also make your phone forget all of your Wi-Fi passwords, which brings us to step 2.
Step 2: Re-Connect to Your Wi-Fi
Tap Settings -> Wi-Fi -> and choose your WiFi network. Enter your password and tap Join.
You'll need to do the same for any other Wi-Fi networks you normally connect to, just as you did back on iOS 5.